ラベル ios の投稿を表示しています。 すべての投稿を表示

2020年3月27日金曜日

ios app, internationalization ,i18n

How to prepare i18n for my ios app.

1. add languages to translate
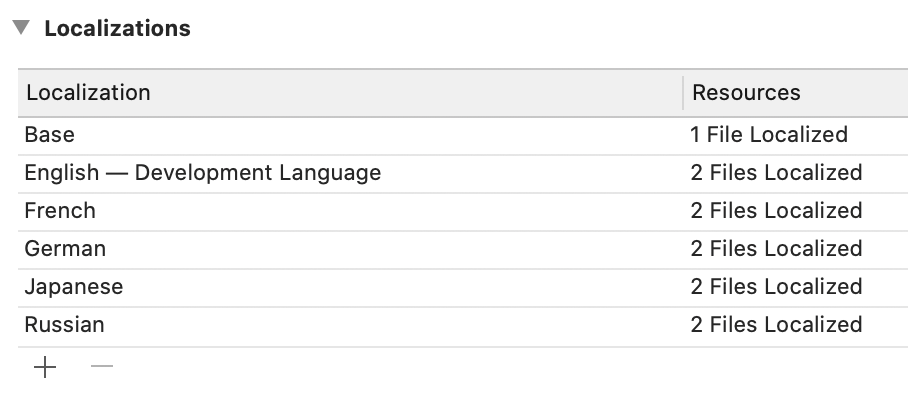
go to project setting and tap info
find Localizations, press + and add any languages 


2. add string file 
This is the list of strings that should be translated in 

File menu and choose New > File, then select Strings File from the list of file types 

2020年2月23日日曜日

xcrum simctl push, send apn payload to ios simulator

Xcrun is the command line tool of Xcode and it's simctl push can test push notification on ios Simulator with xcode 11.4 ( it is still beta as of 23.02.2020)

$xcrun simctl push --help

to get device information and it's identifier run the below command. in general it is easier to using "booted" as targeting device though. however if more than two simulators are running device identifier should be clearly specified.

$xcrun simctl list devices | grep Booted

$xcrun simctl push booted com.example.app payload.json


2020年2月7日金曜日

How to read the log from iOS devices.

Assuming running Xcode


  1.  Go Windows and Devices and then Simulators.
  2.  Choose the  device from the devices section on the left side screen.
  3.  Click Open Console

2020年1月28日火曜日

Swift on iOS13, UIView present

The change on iOS13,  UIView.present default style is card presentation

card presentation


to make it full screen is easy.

solution
to set .fullscreen or .overFullScreen to

modalPresentationStyle

for example

        let viewCon = SampleViewController2(nibName: "SampleViewController", bundle: .main)
        viewCon.modalPresentationStyle = .fullScreen
        self.present(viewCon, animated: true, completion: nil)


.fullScreen

Discussion

The views belonging to the presenting view controller are removed after the presentation completes.

.overFullScreen

Discussion

The views beneath the presented content are not removed from the view hierarchy when the presentation finishes. So if the presented view controller does not fill the screen with opaque content, the underlying content shows through.

2020年1月16日木曜日

ios customise tabbar with UITabBarController

Here is a sample of creating your own UITabBarController and  customise tab bar behaviour on ios. not only customising tint colour of icon or icon itself but also adding more functionality when switching tab, it required to make your own class inheriting UITabBarController but you want to use the views and tab bar controller scene from story board.
  1. start from tab application default
  2. remove segure from story board connected to views from tab bar scene
  3. set story boad ID to each scene which would be navigated by the tab bar. (FirstView, SecondView for example)
  4. create a new class MyTabBarController
    ```
    class MyTabBarController: UITabBarController, UITabBarControllerDelegate {
    var firstViewController: FirstViewController!
    var secondViewController: SecondViewController!
    override func viewDidLoad() {
    super.viewDidLoad()
    self.delegate = self
    firstViewController = storyboard?.instantiateViewController(withIdentifier: "FirstView") as? FirstViewController
    secondViewController = storyboard?.instantiateViewController(withIdentifier: "SecondView") as? SecondViewController
    firstViewController.tabBarItem.image = UIImage(named: "customFirstImage")
    secondViewController.tabBarItem.image = UIImage(named: "customFirstImage")
    viewControllers = [firstViewController, secondViewController]
    selectedIndex = 0
    }
    /*
    // MARK: - Navigation
    // In a storyboard-based application, you will often want to do a little preparation before navigation
    override func prepare(for segue: UIStoryboardSegue, sender: Any?) {
    // Get the new view controller using segue.destination.
    // Pass the selected object to the new view controller.
    }
    */
    }
    ```
  5. set MyTabBarController as the class of tab bar controller in the story board

2020年1月10日金曜日

Swift Dictionary Grouping


     There is the comment in the Dictionary souce code.

    /// Creates a new dictionary whose keys are the groupings returned by the

    /// given closure and whose values are arrays of the elements that returned
    /// each key.
    ///
    /// The arrays in the "values" position of the new dictionary each contain at
    /// least one element, with the elements in the same order as the source
    /// sequence.
    ///
    /// The following example declares an array of names, and then creates a
    /// dictionary from that array by grouping the names by first letter:


let students = ["Kofi", "Abena", "Efua", "Kweku", "Akosua"]
let studentsByLetter = Dictionary(grouping: students, by: { $0.first! })

EnvironmentObject Swift

EnvironmentObject in Swiftaccording to apple's Document A dynamic view property that uses a bindable object supplied by an ancestor view to invalidate the current view whenever the bindable object changes.

Declaration

@frozen @propertyWrapper struct EnvironmentObject<ObjectTypewhere ObjectType : ObservableObject

what does that mean ?


my understanding is that variable wrapped @EnvironmentObject can be shared 
across all views and update view when the variable is updated.
This is like the way React/Redux store doing.
final class UserData: ObservableObject  {
    @Published var showFavoritesOnly = false
    @Published var landmarks = landmarkData
}
struct LandmarkList: View {

    @EnvironmentObject var userData: UserData

    var body: some View {
        NavigationView{
            List {
                Toggle(isOn: $userData.showFavoritesOnly  , label: {Text("Favorites only")})
                ForEach(userData.landmarks) { landdata in
                    if (!self.userData.showFavoritesOnly || landdata.isFavorite) {
                        NavigationLink(destination: ContentView(landmark:   landdata)) {
                            LandmarkRow(landmark: landdata)
                            }.navigationBarTitle(Text("Landmark"))
                        }
                    }
                }
        }
    }
}